A lot of users have recently asked in the GPLDL Forum to add the highly popular caching Plugin WP-Rocket to the GPLDL Premium WordPress Repository.
Since the WP-Rocket Plugin requires an active subscription from its developer WP-Media that will provide you with a license code you will not only need to download the WP-Rocket Plugin from GPLDL but you will also have to follow these instructions to make WP-Rocket work for you.
How does the WP-Rocket Plugin check the license information?
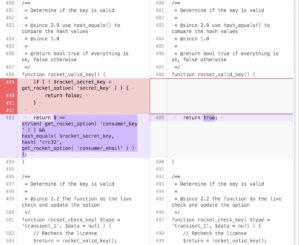
We had a look at the PHP-code of the WP-Rocket WordPress Plugin and found the routine for checking the serial number is hidden in the /wp-rocket/inc/functions/options.php file from code line 488 on.
The routine checks if there is a valid combination of a WP_ROCKET_KEY in line 10, a valid email that was used for the license purchase in WP_ROCKET_EMAIL in line 15 of the /wp-rocket/license-data.php file and a proper WP_ROCKET_PRIVATE_KEY in line 23 in /wp-rocket/wp-rocket.php.
WP-Rocket only displays the full range of settings if all three filled properly.
We checked a little further and realized that it is quite easy to "fork" WP-Rocket with just a simple adjustment of the code in the /wp-rocket/inc/functions/options.php file and thus create a 100% clean, legit and fully functional "nulled WP-Rocket Plugin" yourself.
How can you create a "nulled version" WP-Rocket Plugin yourself?
You simply need to replace the routine checking for a valid WP-Rocket license key with a simple code snippet that always makes the WP-Rocket Plugin believe that whatever information has been entered above is valid.
Therefore open the file /wp-rocket/inc/functions/options.php in any text editor or your favorite code editor and go to line 488.
Replace the block starting with "function rocket_valid_key()" with "return true" exactly in the same way as you can see it in the screenshot above.
Please double check that you remove the code see on the left hand side and enter exactly the same code as seen in the window on the right hand.
Any typos will most likely break the plugin and may make your site unaccessable - so take your time and act at your own risk!
Upload the modified WP-Rocket Plugin to your website
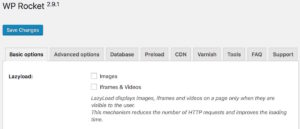
Once the options.php file has been changed and the plugin has been uploaded to your server (via FTP), you will find the entry for WP-Rocket under Settings in the WordPress Admin Panel.
If everything went fine, you will see all option tabs show in the screenshot and you can do the settings for your website.
Final Words
Please also note that you have to make these adjustments in /wp-rocket/inc/functions/options.php with every new version of WP-Rocket.
With this hack you cannot make use of the auto-update within the WP-Rocket plugin (you should definitely get a paid license from WP-Media if you need this feature) and get the update from WP-Media but need to download new versions from GPLDL, make the code adjustments and upload to your website again.
This Guide on how to create your own nulled WP-Rocket Plugin fork which does not require valid license credentials has been thoroughly tested and works well with WP-Rocket 2.91 - the code in future versions may require different adjustments. Use this at your own risk and get a paid license from WP-Media to support their work and obtain support!


